

6 EASY ways to model OSMOSIS

Teaching osmosis?
Osmosis is one of my favorite topics to teach during the cells unit because it’s so easily visualized. There are quite a few ways to easily see osmosis in action! Here’s a round-up of six labs and the pros and cons of each:
1. EGG OSMOSIS
The “naked egg” lab is very popular in biology. Students really get a kick out of seeing the eggshell dissolve! In this lab, students dissolve the shell of an egg by soaking it in vinegar (this takes about 3 days, so its best to set up on a Friday). Once the shell is gone, students carefully transfer their naked eggs to hypotonic distilled water, and a hypertonic solution like corn syrup or molasses. Students compare the mass of the egg before and after soaking and figure out which way the water moved while attempting to reach equilibrium.

PROS: Students love this lab! Also, eggs are round like red blood cells, so they can visualize what happens to cells in different hypertonic or hypotonic solutions.
CONS: It can get expensive to purchase enough eggs for all of your classes. Also, expect some to break along the way, so soak some extras just in case. Overall, it feels a little wasteful of perfectly good eggs. Maybe do this one as a demonstration, and then choose one of the options below for students to do in groups.
2. PURPLE ONION SKIN
Of all the osmosis labs, this one might be my favorite because I’m partial to getting out the microscopes. In this lab, students get a small piece of onion skin and make a wet mount slide using fresh water. They will see nice rectangular purple onion cells. Next, they will swap out the fresh water for salt water, and watch the cytoplasm in each cell shrivel up. If your students already know how to use microscopes, this one is a hit! Here is a full blog post with more details and pictures.
Note: I used to use elodea for this lab, but it became difficult to find at pet stores since it is invasive in many states. Purple onion is easy and cheaper! You can also find a lab write-up here .

PROS: Inexpensive, and fool proof. It is impossible to mess up! Unlike other options, this lab uses real plant cells. Also, it is the only version that doesn’t require soaking things overnight so you can get it done in one class period.
CONS: Your classroom will smell like onion for a day.
3. DIALYSIS TUBING
This version is a little fancier, and is a great option if you have honors or AP students. In this lab, students will get dialysis tubing and fill them with varying concentrations of sugar water solution. They will measure the initial mass of the tubes, and then soak the dialysis tubing overnight in distilled water. The following day they will measure the new mass, and see how water moved across the dialysis tubing membrane. You can find a free version of this lab from Amy Brown on TpT.
PROS: Students collect quantitative data, and it feels more “scientific” than other options.
CONS: Dialysis tubing is expensive, and if students don’t tie the string tight enough they can leak.

4. GUMMY BEARS
I am the first to admit gummy bears are not my favorite option, but I know many teachers who love doing it this way. In this version, students soak gummy bears in tap water, distilled water, and salt water overnight. They measure the change in the size of the gummy bear using rulers.
PROS: A large bag of gummy bears is only a few dollars, and students always love working with candy.

CONS: I don’t love this lab because depending on the brand you buy, the gummy bears can begin to dissolve and fall apart. Also, since they are an irregular shape it is difficult to calculate the change in volume.
5. WATER BEADS
An alternative to gummy bears is water beads, or Orbeez. You set it up the same way by soaking them in fresh water and salt water. If your kid already has some at home, use them instead of gummy bears. I like them better for a few reasons:
PROS: Water beads won’t fall apart like gummy bears, even after soaking multiple days. Since they are round, you can have students measure the diameter, and calculate the volume of the sphere. Also, you can dry them out afterward, place them in a Tupperware, and re-use them the following year.

CONS: Orbeez are smaller than gummy bears, so if your students struggle taking small, accurate measurements that might be a point of struggle. (Note: Beware of cheaper off-brands you can find on Amazon, because they WILL fall part unlike Orbeez).
6. BABY CARROTS
Last but not least are baby carrots! In this lab, each lab group gets 2 baby carrots. Just like other labs, they measure the mass before and after soaking them in fresh and salt water. Students will also notice that the baby carrot soaked in salt water becomes flimsy and bendable overnight. If you have already covered organelles, this can lead to a discussion about vacuoles and how plant cells become limp and flimsy when they lose water. You can find a lab write-up on my website !

PROS: Inexpensive materials, and uses real plant cells.
CONS: You won’t see the size of the carrot change, only the flexible vs stiff texture.
Alright, which is your favorite? Choose one (or two) and have a blast!

- Read more about: Cells

Hi, I'm Becca!
Search the site, browse by category.
- Back to School
- Biochemistry
- Body Systems
- Classification
- Classroom Decor
- Classroom Management
- Distance Learning
- End of the School Year
- Experiments
- Field Trips
- For NEW Teachers
- Formative Assessment
- Media in the Classroom
- Microscopes
- Photosynthesis & Respiration
- Plate Tectonics
- Sustainability
- Teacher Tips
- Weather and Climate
Get Freebies!
You might also like....

Teaching DNA Structure and Replication just got easier


10 Atmosphere Lessons for High School

Read Aloud Closure Assignments

Want a fun way to practice science vocabulary? Try out seek and finds!

Privacy Overview
- 07847 006 048
- [email protected]

Gummy Bear Osmosis Experiment
Gummy Bear Osmosis experiment is a fun demonstration to help explain the tricky subject of osmosis, as well as being a great way to teach experimental design. It’s also an experiment you can eat when you’re finished! Read on to find out why the Gummy Bear Osmosis Experiment is so good at teaching osmosis (obviously!), but also experimental design, mass, weight & volume as well as embedding maths.
OK, so lets start at the beginning……
What is Osmosis?
Osmosis is the diffusion of water molecules from a dilute liquid (where there are many water molecules) to a more concentrated solution (where there are fewer water molecules) across a selectively permeable membrane. Selectively permeable is a membrane which allows some molecules to pass through but inhibits others. These membranes can be found in nature, such as membranes surrounding cells or synthetically made membranes.
Why a Gummy Bear?
The Gummy Bear has a selectively permeable coating which will allow water molecules to diffuse across, but inhibiting other larger molecules. In this osmosis experiment the water molecules move into the bear, thus enlarging it.
Material used
You’ll need these things:
- Gummy bears
- Water (and other liquids for the extended project)
- Paper towels
- Kitchen item for measuring liquids, e.g. measuring cup/jug/cylinder.
- Weighing scales/balance that can weigh to 0.1g increments.
1) Take 2 gummy bears that are the same colour and similar size. Record their weights*. *see Lab Notes below.
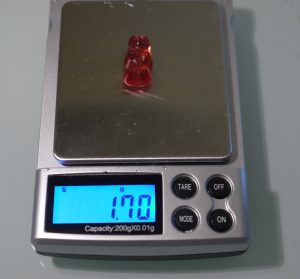
Record the weight of the gummy bear before the experiment
2) Take 2 identical cups, and put a gummy bear in each. Fill ONE cup with water so that the bear is submerged, but measure the amount of water you use as this information will be useful later on. The other cup remains dry (no water). This is your control bear which will prove the bear does not enlarge without water!
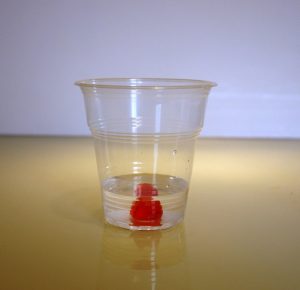
Set up of the TEST gummy bear.
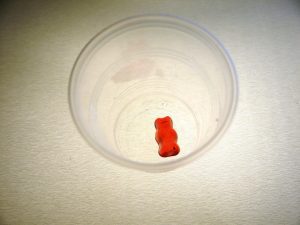
Set up a control gummy bear (no water)
3) Leave both bears for several hours, or overnight preferably and then compare gummy bears.
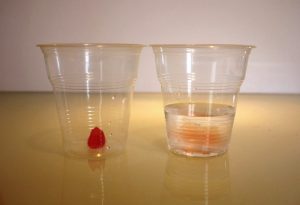
Gummy Bear Osmosis – the results
4) The next day, take the bears out of their cups, trying not to lose any water from the wet bear, and pat the wet one dry with a paper towel.
Now weigh both bears, and record the results.
Calculate the weight gained by the enlarged bear by subtracting the weight before from the weight after. We need to check the weight of the control bear as well, as this may have changed too.
Take this a step further if you want to, by calculating the percentage weight* gained.
* see Lab Notes below.
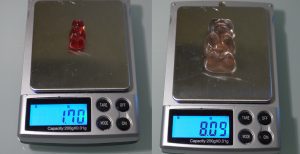
Comparison of before & after weights – this Gummy Bear gained 6.39g
5) Finally, measure the volume of water left behind in the enlarged bear’s cup…has it altered? Where has it gone??
How did the bear get so BIG?
Well, we already know from the introduction that water diffuses from an area of high concentration of water molecules (i.e. a dilute solution) to an area of low water concentration. In this experiment water moves into the Gummy Bear, where there are fewer water molecules, making it swell up. The water keeps moving until the water molecules are evenly spaced out (i.e. have reached an equilibrium). The molecules stop diffusing when they reach equilibrium.
Make this a bigger project.
So we put our bear in water, which obviously has lots of water molecules in, but what if our liquid had fewer water molecules compared to the bear. What would happen? Which direction would the water molecules move and what effect would that have in the bear?
……Over to you to find out….
Extend this experiment by trying different liquids, such as vinegar, salty water, juice and so on. Make sure you set them all up at the same time so the bears spend an equal amount of time in each liquid, and always include a control Gummy Bear (bear in no liquid).
Why must the bear be the the same colour?
Changing the colour adds a new variable to the experiment, and you need to be sure that any change in the gummy bear size is due to the water you are putting them in, and not their colour!
Why do they have to be the same size?
Well they don’t really have to be, but they should be about the same size, for the same reasons we need the colour to be the same. You are calculating the change in weight, which is more accurate than just looking at the bears and saying that one is bigger than the other! What does “bigger” mean?
How to calculate percentage weight gain.
To find out the percentage gain, you divide the weight gained by the start weight and multiply by 100 . This is useful because it allows you to compare the results of different Gummy Bear osmosis experiments, where the start weight will be slightly different for each bear.
Lets look at my example above:
The bear gained was 6.39 grams and the start weight was 1.7g….so, 6.39g divided by 1.7g = 3.76g x 100 = 376%. So the bear has an increase in weight of 376%.
If you tackle this activity at home you do so at your own risk. If you have as much fun as we did, feel free to share your pictures with us on our Facebook page.
Chief Scientist at Devon Science
Want more easy science to do?
So you liked this activity and want more ideas, right? Well head on over to our blog to find out other cool experiments such as Glowing Fluorescent Liquid or the Super Easy 6 – a free download with 6 super-easy experiments to try at home!
Username or email *
Password *
Remember me Login
Lost your password?
£0.00

IMAGES