
Graphic Organizers and Note-Taking Strategies
Graphic organizer templates & examples.
Make copies of the following templates and examples, and make the graphic organizers your own!
- "Argumentative Essay G.O."
This helps students organize essays by breaking down parts of an argumentative essay in different sections.
- "Cause and Effect Template 1 G.O."
This cause and effect template shows how a single cause can have multiple effects.
- "Cause and Effect Template 2"
This cause and effect template emphasizes that multiple causes can lead up to and be responsible for an event (or the effect in this case).
- "Cause and Effect Chain Template"
Students identify actions that caused other actions and their effects. I would love to see this used in science or social studies classes where students are asked how something happened and are forced to work backwards.
- "Chain of Events G.O."
Describe the stages of an event, the actions of a character, or the steps in a procedure.
- "Character Analysis Pyramid"
Identify major points of the specific characters of a story using this pyramid graphic organizer.
- "Character Map Template"
Students list important information about a character, like what the character looks like, says, and thinks, and what the student feels and thinks of the character.
- "Character Study Web"
Use this graphic organizer to describe a character in detail by writing from that character's perspective.
- "Clustering Web"
This is a nonlinear activity that generates ideas, images, and feelings around a stimulus word. As students cluster, their thoughts tumble out, enlarging their word bank for writing and often enabling them to see patterns in their ideas. Clustering may be a class or an individual activity.
- "Compare/Contrast Matrix"
Use this graphic organizer to show the similarities and differences between two things.
- "Comparing Concepts"
Use this graphic organizer to explore the analogous as well as non-analogous characteristics of the two concepts related to a given topic.
- "Concept Word Map"
Use this graphic organizer to define, describe, and provide examples of concept words.
- "Cycle Diagram (3 Steps)"
A three-step cycle diagram is used to show how a series of events interact repeatedly through a cycle.
- "Cycle Diagram (4 Steps)"
A four-step cycle diagram is used to show how a series of events interact repeatedly through a cycle.
- "Decision-Making Model"
Use this to identify a problem and list possible solutions to said problem.
- "Evaluation Chart Template"
Lets students identify criteria, explain whether it was successful and why, and provide evidence.
- "Fishbone Diagram"
A fishbone diagram (also called a cause and effect diagram or Ishikawa diagram) is a visualization tool for categorizing the potential causes of a problem in order to identify its root causes.
It is useful in brainstorming sessions to focus conversations. After the group has brainstormed all the possible causes for a problem, the facilitator helps the group to rate the potential causes according to their level of importance and diagram a hierarchy. The design of the diagram looks much like a skeleton of a fish.
- "Fishbone Planner Template"
Students can list the advantages and disadvantages of a topic. You can also use a T-Chart for this task, but this emphasizes the advantages and disadvantages being about a comparable part of the topic.
- "Flow Chart Template"
Students can display the linear relationship among several things.
- "Frayer Model Template v.1"
Provides a framework for thorough understanding of new words.
- "Frayer Model Template v.2"
This document provides a framework for thorough understanding of new words. This layout places a visual emphasis on the word you are learning about.
- "Frayer Model Template (Modified)"
This changes the traditional Frayer Model's "examples" and "non-examples" boxes to boxes containing information on how the focus word is used in a sentence and one on examples or illustrations.
- "Hexagonal Thinking Template"
Start by identifying a problem, and then write various components or issues surrounding the problem on separate hexagon-shaped pieces of paper, matching together the ideas that are connected. Patterns and relationships will then begin to develop.
- "IVF Summary Topic Sentences"
IVF stands for "Identify the item, select a verb, and finish your thought." Use this graphic organizer to teach students how to begin a summary and/or write a topic sentence.
- "KLEW Chart Template"
The KLEW Chart is similar to the KWL Chart; however, the KLEW Chart leaves room for further questions to be asked (these could possibly be used for a Genius Hour project) and places an emphasis on using evidence to support student findings.
- "KWHL Chart Template v.1"
This variation on the KWL Chart encourages students to develop their own means of how they will discover more information.
- "KWHL Chart Template v.2 (KWL 4 Column)"
This is a group instruction activity that serves as a model for active thinking during reading.
This copy provides a more thorough description of the activity beforehand.
- "KWL Chart Template v.1"
A KWL Chart (also known as a KWL Table) is a brainstorming and guiding graphic organizer used to show what students already know as a lesson begins, what they want to know, and what they ultimately learn. It activates students' prior knowledge and sets a purpose for a lesson or unit.
- "KWL Chart Template v.2"
This is the same as the one above, but it is less colorful and a little cleaner.
- "Mind Maps Web"
Mind Maps show the associations between ideas and concepts. This can be useful to identify problems and the relationships between them as well as planning a piece of writing.
- "Plot Mountain Graphic Organizer v.1"
This document shows the five stages of plot.
- "Plot Mountain Graphic Organizer v.2"
This shows the five stages of plot, as well as the conflict, effects of setting, theme, and details of the exposition.
- "P-M-I Chart"
One way to differentiate assessment is through the Pluses, Minuses and Interesting/Intriguing (PMI) chart. Through this chart or graphic organizer, students examine the “+”, “-“, and Interesting things associated with a topic, idea, or decision.
- "Sequencing Chart (6-Steps) Template"
Students fill out this chart to show the sequence of events, like the "Cause and Effect Chain Template," but it can also be used by students to show the steps for following specific instructions.
- "Spider Map Web"
This graphic organizer is used to describe a central idea: a thing, process, concept, or proposition with support.
- "State or Country Research Web"
Have students fill in this graphic organizer's boxes with information about the state or country they are researching.
- "Story Map 1"
Use this to have students enter information about the plot of a story, specifically its beginning, middle, and end.
- "Story Map 2"
Use this to have students enter information on the characters, setting, problem(s), and solutions to a problem(s) in a story.
- "T-Chart"
These are a type of chart in which a student lists and examines two facets of a topic, like the pros and cons associated with it, its advantages and disadvantages, facts and opinions, etc.
- "Think About Your Thinking Template"
This helps students think through their decisions and how they arrived at their conclusions.
- "Timeline Template"
Timelines can be used to show the order steps should go in or to show the passage of time for a historical event. These can easily be created in Google Drawings or in Google Slides.
- "Venn Diagram Template (Two Circles)"
Use a Venn diagram to show the similarities and differences between two characters, stories, events, arguments, etc.
- "Venn Diagram Template (Three Circles)"
Use this Venn diagram to show the similarities and differences between three characters, stories, events, arguments, etc.
- "Venn Diagram Template (Two Rounded Rectangles)"
Use a Venn diagram to show the similarities and differences between two characters, stories, events, arguments, etc. I prefer using this more squared-shaped Venn diagram as students sometimes say they don't have enough room to write when circles are used.
- "Vocabulary Concept Map"
This graphic organizer lets students make connections to other words from a specific vocabulary term.
- "Word Study Diagram"
Fill a word in the center box, and then fill in the rest of the diagram to define and explain the word.
- "Word Web/Semantic Map Template"
Students branch ideas out from a main topic into subtopics.
- "Y-Chart"
Use this graphic organizer to share three pieces of information about a topic.
Note-Taking Strategies
- "Taking Notes Using Cornell Note Style"
This document explains how students should create and take Cornell notes.
- "Cornell Note-Taking Template"
This note sheet organizes students' notes, helping them list main ideas and support the main ideas with evidence and details. Upon completion of the notes, students are asked to summarize their notes.
Graphic Organizers / Templates / Slideshows
Below are some graphic organizers, templates, and slideshows that I use in my writing class. They're designed to be used as attachments on Google Classroom assignments. Each graphic organizer is a slideshow with blank spaces for students to plan out their pieces. There's also Google Doc writing templates to get your students started. Feel free to grab a copy of whatever you'd like.
Once attached, be sure to click the "Make a Copy for Each Student" button before assigning them to your class.
If you're brand new to Google Classroom, check out the video on the right to see how to create assignments.
Short Story
Personal Narrative
Persuasive letter, opinion piece, choose your own adventure, research article, screenplay / drama, additional slideshows/resources.

Tuesday, January 5, 2016
Language arts graphic organizers with google drawings.

- Loads of ways to add images, shapes, connectors, text, and more
- Easy to collaborate with partners or for a whole class brainstorming activity
- Final product can be shared as is, or can be exported in several formats
- It’s free!
- Training video - "Google Drawings for Graphic Organizers" - YouTube Video
- Help Guide - "Using Google Drawings" - Google Document link
- Help Guide - "Google Drawings for Graphic Organizers" - Google Document link
- Slideshow - "Google Drawings for Graphic Organizers" - Google Slides link
18 comments:
These are great! Thank you for creating these!

This comment has been removed by the author.
Fantastic! I'm sharing with my teachers! Thank you Amy
Fabulous! Thanks for sharing!
Thank you Eric! I also want to tell you I like the way your site looks, very clear!
Thanks for creating and sharing these Google Drawings!
These are terrific. I cannot thank you enough for sharing!
These are wonderful! You are making my life easier. Do you have access or have you created a plot diagram? I'm looking for something that has exposition, rising action, conflict, climax, falling action and resolution that could be directly accessed and written upon, in google docs. Thanks so very much!
What a fabulous resource! Glad to follow your blog! Thanks so much for the generous sharing.
I am very interested in exploring your templates. They sound like a great time saver but the link for your Google Organizer Template folder does not appear to be working. Please help!

My Drive has been acting odd lately so that my shared resources are not always available. I contacted Google support and I think everything is ok now. Please check again and let me know if you have any difficulty opening the resources now.
Wow awesome!! Love these. Thank you!
Hi Eric, I am trying to check out your templates...I can look at each one individually but am not able to access the folder. Thanks so much for sharing all of your work...love your videos, document tutorials and slide shows. You have put a ton of work into all of your resources. THANKS!!!
Your site is amazing! Thank you for all your hard work and for sharing these resources with us.

Thank you - great info!! I just discovered your site/resource this morning --- very (very) helpful! Karen
Here are some more useful tips on how to get your essay better subject.
Good Chinese translation is in great demand these days because China is the new economic powerhouse in the global economy. Possessing one of the largest industrial bases and consumer markets in the world, it is an eager partner for mutual prosperity with you in today's world of economic challenge. Mandarin language.

Very nice information you have shared. I appreciate your work and looking forward to reading more such informative articles from your site. Keep updating and in the mean time, you can check out my blog for about Apple iPad Mini 5 Feature, Release Date and concept. Please visit our site iPad Mini 5 for more information.
10 Ways to Organize Documents in Google Docs
Effectively organizing documents, especially lengthy ones, can be challenging. With the built-in features in Google Docs , you have several ways to compose reports, articles, essays, proposals, team documents, and more in an efficient way.
You need to structure the document so it’s easy to display information and scan for details. So, let’s look at several key features for organizing your next Google Doc.

1. Scan the Document With a Summary and Outline
One of the simplest ways to create an overview of your document details is with the summary and outline features. These handy tools sit outside the content so they don’t distract and can be shown or hidden with a click.
These organizational features let you summarize the contents of your document and skip to the section you need with the automatically generated outline.
Show and Close the Summary and Outline
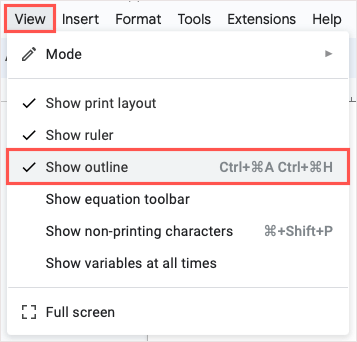
To display the summary and outline, head to the View tab and select Show outline .
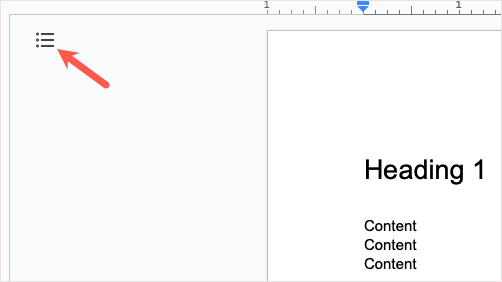
You’ll then see the Show document outline icon on the top left of the document space. Select it to expand it.
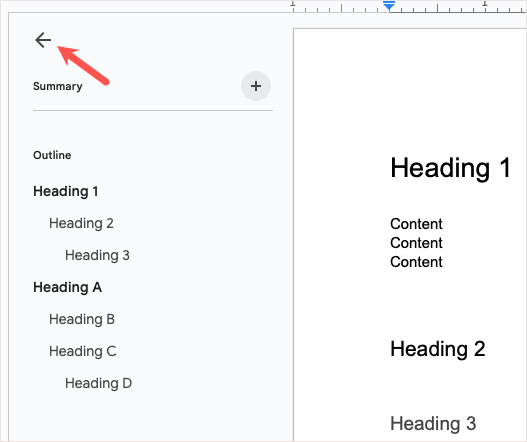
When you finish with the summary and outline, use the Close document outline arrow to hide it and display the Show document outline icon again.
Add a Summary and Outline
To add a summary, use the plus sign to open the box and enter your text.

To change it later, just select the Edit icon (pencil).
To use the outline, add headings to your document (explained below), and they’ll appear in the outline automatically. You can then select a heading to jump to that section of the document.
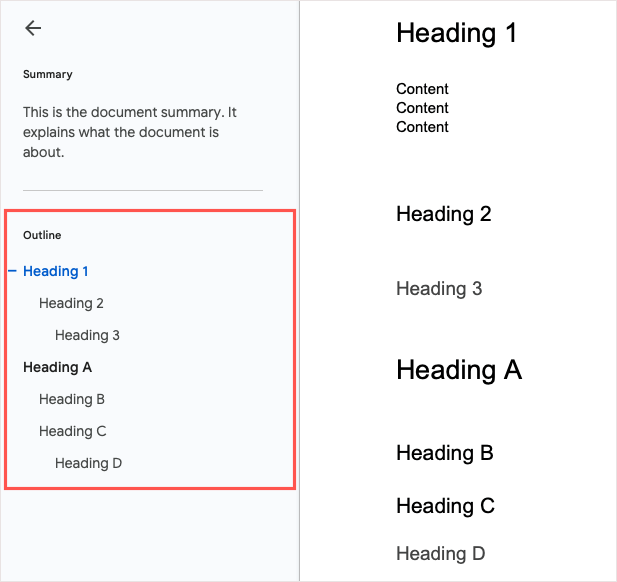
You can remove a particular heading from the outline if needed by selecting the X to the right of it in the outline.
2. Include and Customize a Table of Contents
If you want something within the content that your readers can use to navigate your document, you can insert a table of contents in Google Docs. This feature was basic, but Google has enhanced it over time to make it customizable and attractive.

Insert a Table of Contents
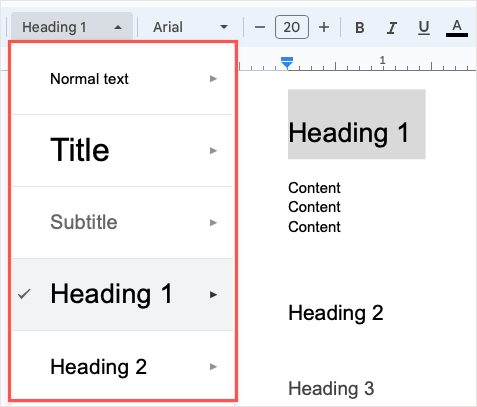
To create a table of contents, structure your document section with headings. Enter text for a heading, select it, and then pick a heading level from the Styles drop-down box in the toolbar. These headings automatically appear in the table for you.
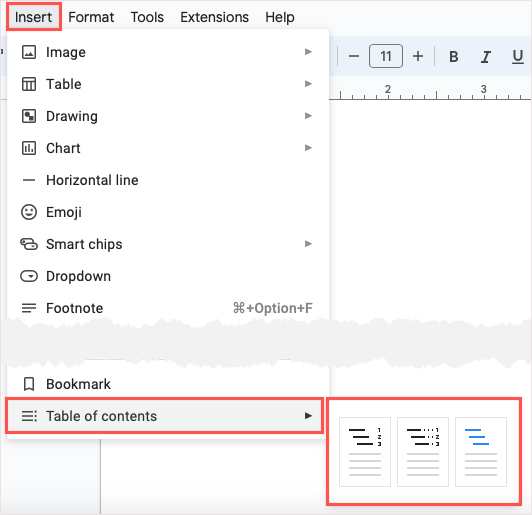
When you’re ready to insert the table, place your cursor in the document where you want it. Then, open the Insert menu, move to Table of contents , and pick a style from Plain Text, Dotted, and Linked.
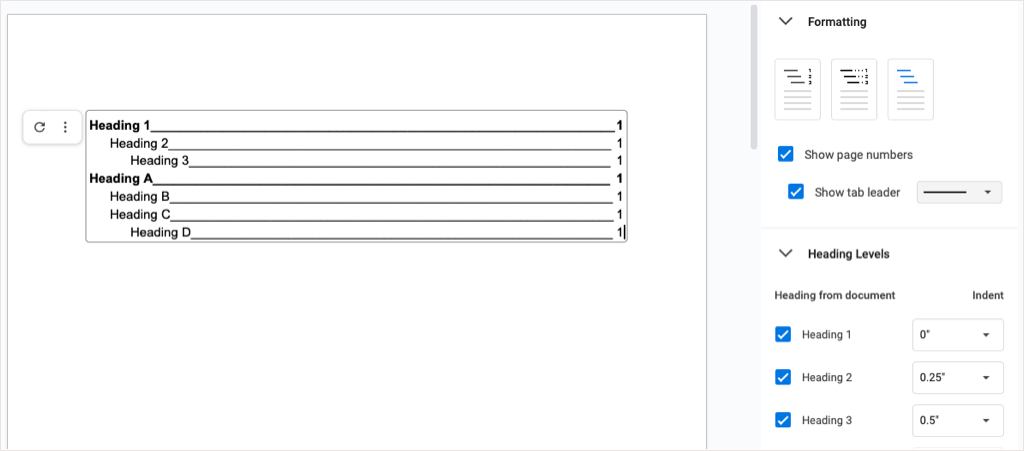
Choose the design you want to use, and you’ll see the table appear.

Customize a Table of Contents
You can adjust how your table of contents looks and works in Google Docs, which is a nice feature.
To open the editing tools, select the table to display the small toolbar. Then, use the three dots on the toolbar to pick More Options .

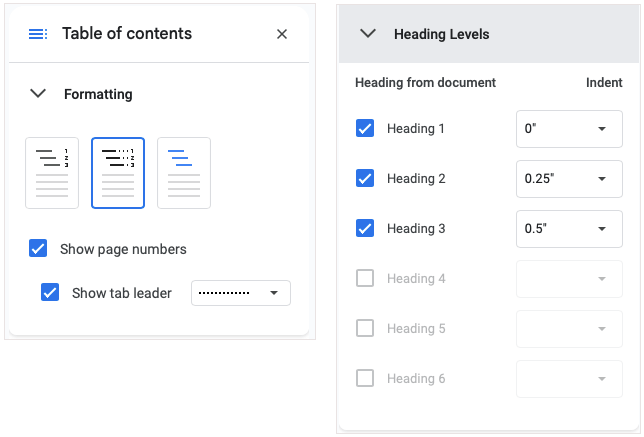
When the sidebar opens, you’ll see two sections for Formatting and Heading Levels.
- Formatting : Choose a different table style, show or hide the page numbers, and optionally use a tab leader like dots, dashes, or lines.
- Heading Levels : Pick the headings you want to display in the table and optionally adjust the indents.
You should see your adjustments update in real time.
3. Work Efficiently With Collapsible Headings
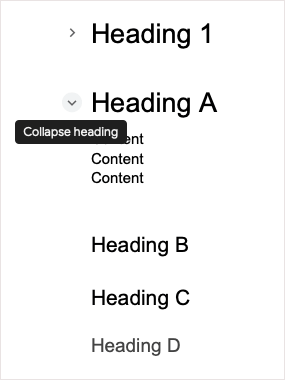
Google added a super helpful feature to Docs in early 2023 that allows you to work with lengthy documents a bit easier. You can collapse and expand the headings. This is great for focusing on sections of the document you’re using while collapsing those you aren’t.
As of this writing, the collapsible headings only work when you use the Pageless layout. It’s unclear if the feature will eventually carry over to the Pages layout.
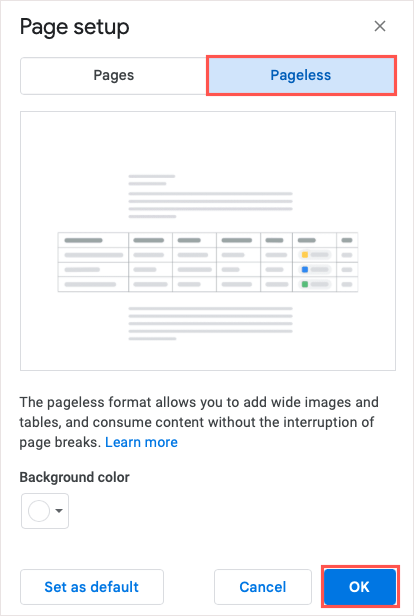
To use the Pageless layout in a new or existing document, go to File and select Page setup . Then, choose Pageless at the top and OK at the bottom.
You should see arrows to the left of the headings in your document. Simply use those arrows or right-click to collapse and expand the headings.
4. Track Info Easily With Building Blocks
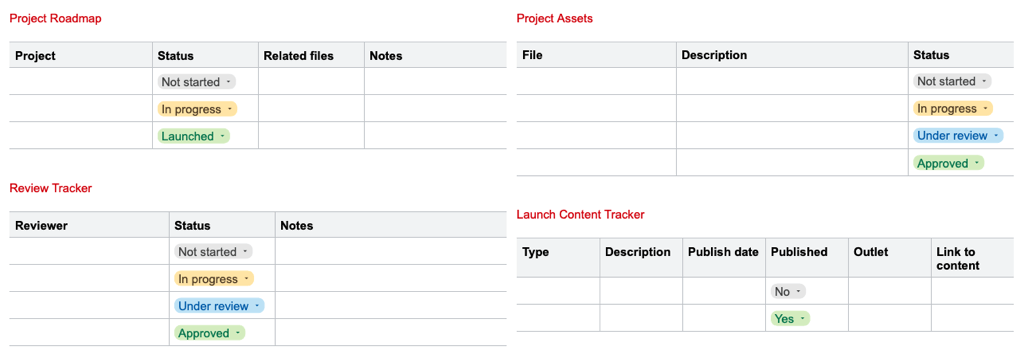
Building Blocks in Google Docs give you quick and convenient ways to display information using tables, text entries, and drop-down lists. Simply insert one of these prepackaged blocks and enter your details in one spot.
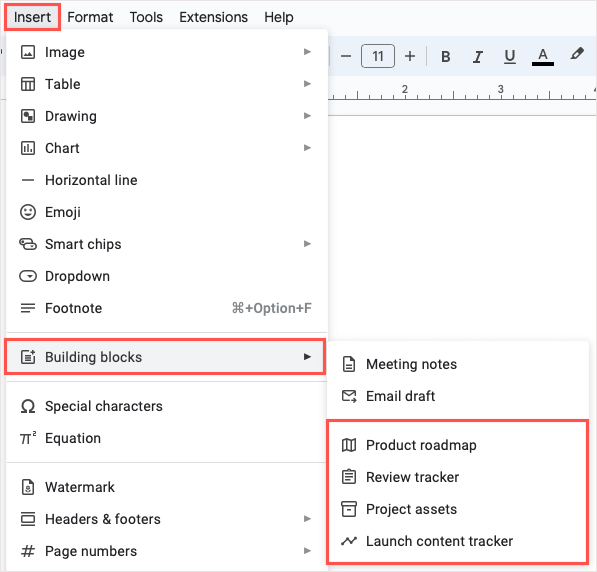
You can currently choose from four premade blocks, including a product roadmap, review tracker, project assets, and launch content tracker. You can use the Building Block as-is or customize it to suit your needs.
To insert a Building Block, select a location in your document and go to Insert > Building blocks . Choose the type you want to use from the pop-out menu.
You’ll see the block pop into your document, ready for you to use. If you want to change the headings to match your content, you can edit them like any other text.
5. Create and Reuse Custom Blocks
If you have a supported work or school Google account , you can set up custom Building Blocks in Docs. This allows you to create a block, save it, and reuse it. The block is saved to your Google Drive as a Google Docs file type, so you can use it in new documents down the road as well.
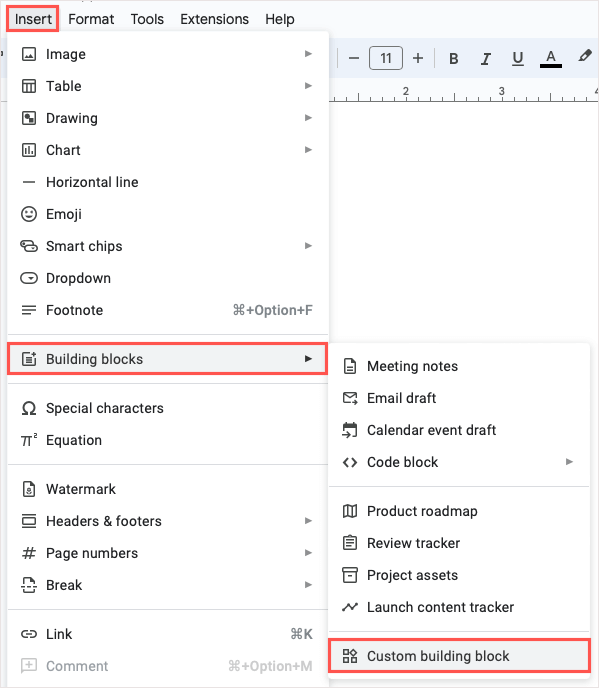
- Go to Insert > Building blocks and pick Custom building block in the pop-out menu.
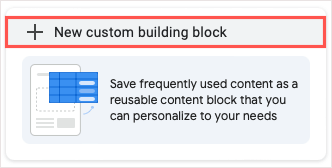
- When the pop-up message appears in your document, choose New custom building block .
- Select the content you want to use as the custom block and choose Save in the blue bar at the top.

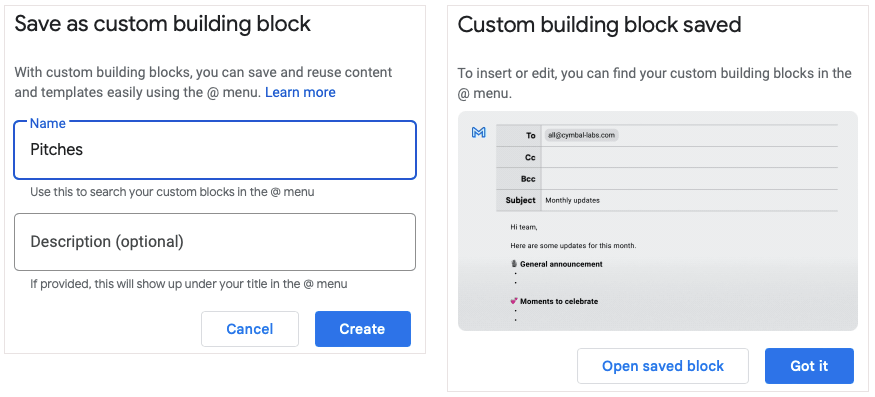
- Enter the name for your block and, optionally a description. Then, select Create . You’ll receive a confirmation that your block has been saved.
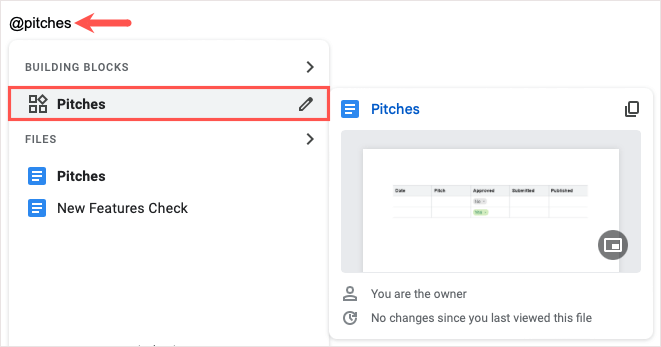
To use your new block, type the @ (At) symbol followed by the block’s name and choose it from the list that appears.
6. Enter Programming Snippets With Code Blocks
If your document contains programming code like Java, JavaScript, or Python, you can take advantage of the code Building Block. This allows you to structure your code neatly in your document.
Go to Insert > Building Blocks , move to Code block and choose the language in the pop-out menu.
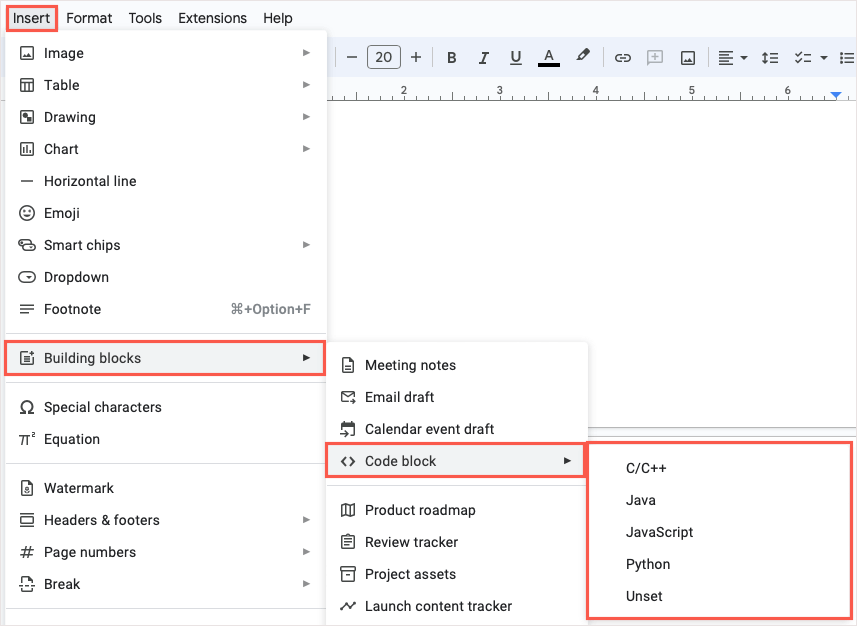
When your block appears, simply enter your snippet. If you want to change the programming language, use the drop-down box on the top left. To update the colors, use the Refresh icon on the top right.

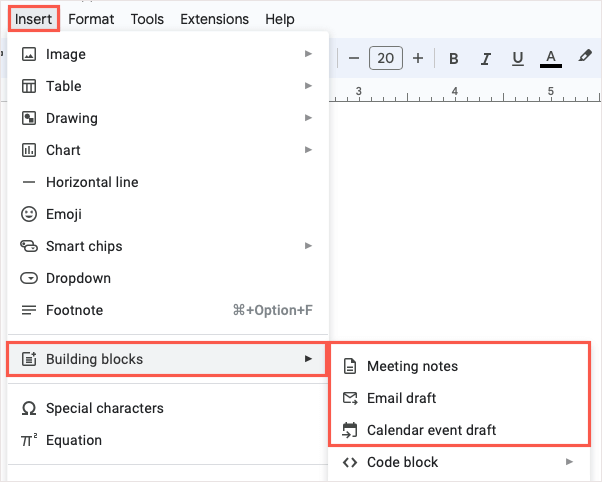
7. Collaborate on Emails, Calendar Invites, and Meeting Notes
Another cool tool to organize items in Google Docs is a built-in template block. These are especially useful if you’re collaboratively working together on emails, calendar invites, and meeting notes.
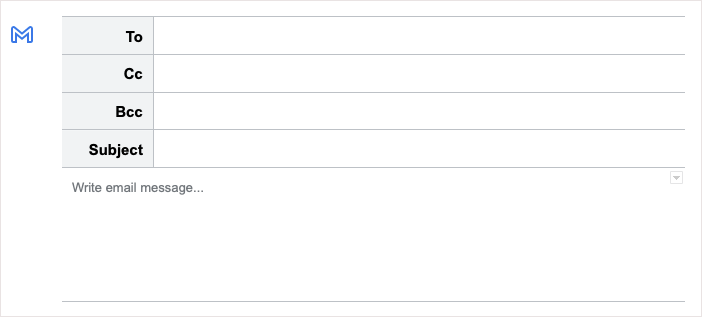
For emails, you can fill in the recipients, subject, and message. Then, select the Gmail icon to create the draft directly in Gmail.
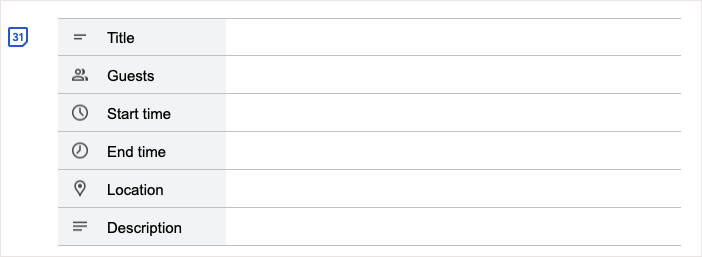
For calendar invites, enter the title, guests, start and end times, location, and description. Use the Calendar icon to open the event in Google Calendar.
For meeting notes, choose an event from the drop-down list, and you’ll receive a block with the title, date, and attendees with bullets for notes and checkboxes for action items. Use the Email icon to create a draft with the meeting notes in Gmail.
MISSING IMAGE
To use one of these templates, go to Insert > Building Blocks and pick an option from the pop-out menu.
8. Enter Details Using a Drop-Down List
Using the Building Blocks above for tracking information, you can take advantage of Google Docs’ premade drop-down lists. However, you can create a drop-down list of your own just like in Google Sheets . This is handy for you, your readers, or your collaborators to enter the details you need easily.
Place your cursor where you want the list, open the Insert menu, and choose Dropdown .
To use a premade drop-down list, choose one from the bottom section.
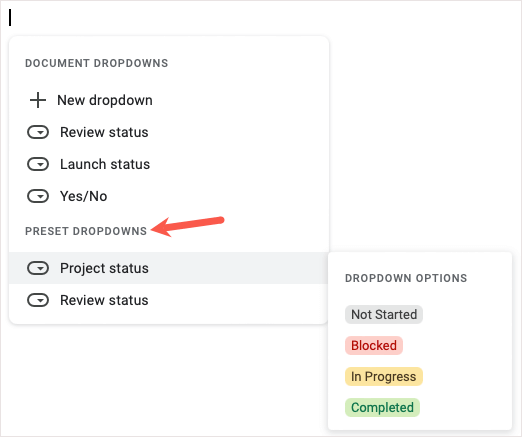
To create your own, choose New dropdown . Then, enter the name and list of options. You can choose a color next to each list item, add more items, and rearrange the order using drag-and-drop. When you finish, select Save .
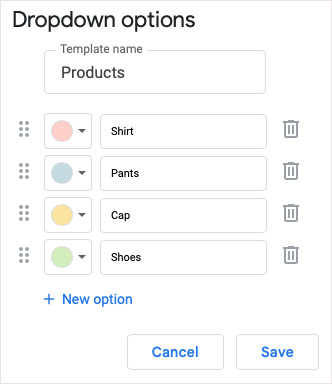
You’ll then see your new drop-down list, which you can reuse repeatedly. Simply select it from the Insert > Dropdown menu.
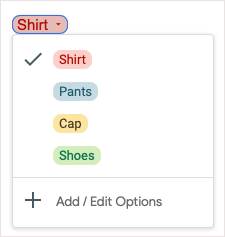
To make changes later, open the drop-down list and choose Add / Edit Options .
9. Pop In Information With Smart Chips
To list and view contacts, events, files, locations, and dates clearly, you can insert Smart Chips in your documents . These nifty tools stay condensed but expand to show the details and allow you to perform actions with a click.
You can insert a Smart Chip by typing the @ symbol followed by the item’s name or by going to Insert > Smart chips and picking one from the pop-out menu.
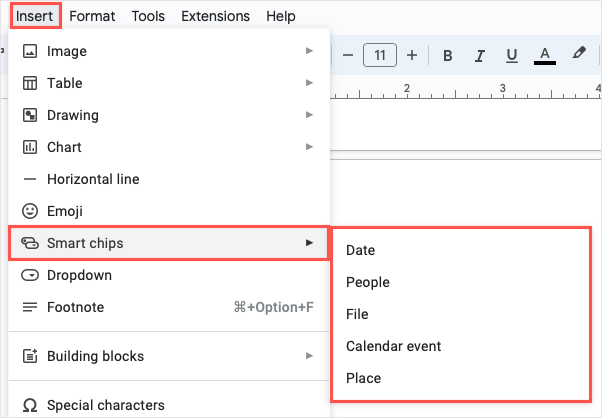
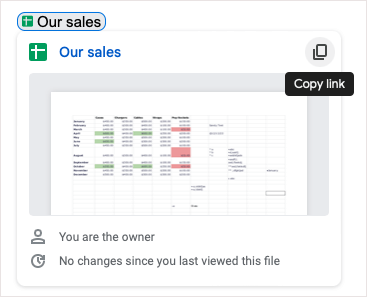
Once you insert the chip, hover your cursor over it or select it to view a preview. Each chip contains different details and actions depending on the chip type. For example, with a File Smart Chip, you can preview the file, copy a link to it, or open it.
If you have a supported Google Workspace account , you have access to additional Smart Chips, including a stopwatch, timer, and reusable variables.
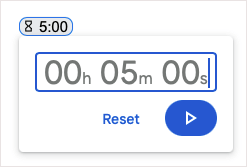
Take advantage of these Smart Chips to include the information you need while keeping your content short and sweet.
10. Insert Equations With Ease
One more good tool Google Docs offers is for equations. Whether a student or professor, you can stop searching for the correct symbols and then format them to fit your document. Just use the equation editor.
To open the editor, go to View > Show equation toolbar . You can also select Insert > Equation . You’ll see the editing toolbar appear at the top of your document.
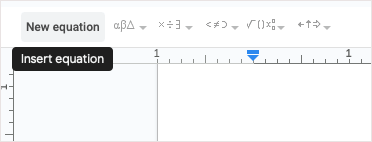
Use the drop-down boxes within the toolbar to add your symbols. You can use Greek letters, math operators, relation symbols, and arrows.
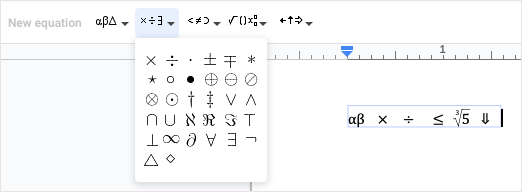
You’ll then see your equation appear in a nice and neat text box within your document.
From a summary to a tracking table to a drop-down list to a detailed chip, you can organize your Google documents in a variety of ways to meet your needs. Which of these features will become your fast favorite?
For related tutorials on other Google apps, look at how to set an expiration date on your Google Drive files.
Related Posts
- How to Flip Images in Google Docs
- How to Fix Mouse Cursor Disappearing on Google Docs
- How to Add Line Numbers in Google Docs
- How to Insert Word Art in Google Docs
- How to Insert Variable Smart Chips (Placeholders) in Google Docs
Sandy Writtenhouse is a freelance technology writer and former Project, Department, and Program Manager. She turned her education, job experience, and love of technology into a full-time writing career. With all sorts of gadgets in her home and her hands, she seeks to help others make life easier through technology. Read Sandy's Full Bio
Ready for the best newsletter in tech?
Get daily tips, tricks, guides, and special offers delivered right to your inbox.

COMMENTS
Create and edit web-based documents, spreadsheets, and presentations. Store documents online and access them from any computer.
See below for directions on how to create graphic organizers with Google Drawings (including a help guide and a recorded webinar) as well as 30 free sample graphic organizers that you can...
****BEFORE YOU ASK FOR ACCESS, GO TO “FILE”, AND THEN “MAKE A COPY”**** Essay Outline Template I. Introduction a. General Background Information (1-2 sentences) i. Attention grabbing intro ii. Who, What, When, Where – establish topic b. Write your Thesis Statement i. an arguable sentence, w...
Make copies of the following templates and examples, and make the graphic organizers your own! This helps students organize essays by breaking down parts of an argumentative essay in...
Below are some graphic organizers, templates, and slideshows that I use in my writing class. They're designed to be used as attachments on Google Classroom assignments. Each graphic organizer is a slideshow with blank spaces for students to plan out their pieces.
0Student Name Instructor Name Course Title, Block Date What is an Essay? All essays start with a hook, also called a lead. A hook (or lead) is usually a sentence that is not itself a question. However, it causes the reader to ask him- or herself a number of questions. It generates interest in the...
Students can use them to plan an essay, compare and contrast characters, detail the sequence of a story, explore the meanings of a word, and much more. There are many tools for creating and using graphic organizers, but one great option is Google Drawings. Some benefits include: It’s free!
This graphic organizer will outline students’ 5-paragraph persuasive essay and prompt them to organize their introduction, body paragraphs, and conclusion. Suitable for online learning and formatted for Google Drive®!
Using Google Drawings to create graphic organizers can help students gather their thoughts and customize to their needs. Here are 25 templates to get you started.
Effectively organizing documents, especially lengthy ones, can be challenging. With the built-in features in Google Docs, you have several ways to compose reports, articles, essays, proposals, team documents, and more [...]